
Want to create a functional solar cell at home? Whether you’re a science lover or a DIY enthusiast, this step-by-step guide is for you. Solar energy plays a critical role in sustainable living, and building your own solar cell is as educational as it is environmentally friendly. The best part? You can do it using things you probably already have at home.
By the end of this article, you’ll know exactly how to make a solar cell with household items. You’ll also learn how it works and get tips to make your project a success.
What is a Solar Cell?
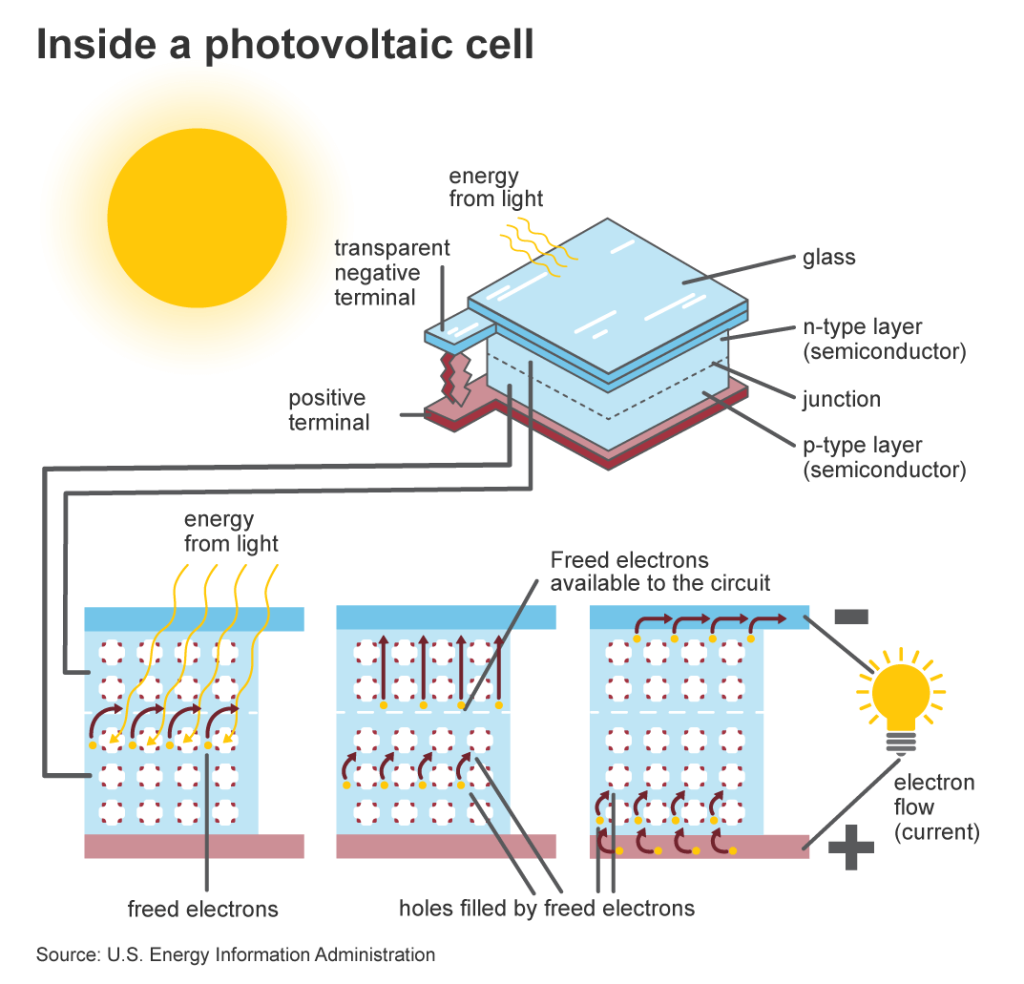
At its core, a solar cell is a device that converts sunlight into electricity. It’s a small but significant component of a larger solar panel. Solar cells are made up of the following components:
- Semiconductor material: This is typically silicon and is responsible for converting sunlight into electrical energy.
- Electrodes: These conduct electricity generated by the sunlight.
- Transparent covering: Provides protection while allowing sunlight to pass through.
While commercial solar cells use advanced materials, you can replicate the concept on a smaller scale using household items (don’t worry, we’ll guide you step by step).
Materials You’ll Need
Here’s your checklist for building a solar cell at home. Most of these items are likely already in your kitchen or tool kit!
- Copper sheet: Acts as the main conductive material in your solar cell.
- Saltwater solution: A homemade electrolyte solution essential for the chemical reaction.
- Transparent plastic or glass: Serves as the protective covering for your solar cell.
- Alligator clips: Used to connect your copper plates to a circuit.
- A small electric device or voltmeter: For testing electricity output.
Once you’ve gathered these materials, it’s time to jump into action.
Suggested – Creating Your Perfect Workspace on a Budget
Step-by-Step Guide to Making a Solar Cell at Home
Step 1: Prepare the Copper Plate
- Cut the copper sheet: Take a piece of copper sheet (around the size of your palm works well).
- Heat it on a stove for oxidation: Place it on a stove. Heat it until a black layer of copper oxide forms on the surface. The heat helps create a crucial inactive layer.
- Cool it down and clean: Remove the sheet from the heat and allow it to cool naturally. Then, gently clean it with a cloth to remove loose flakes of copper oxide.
Step 2: Create the Electrolyte Solution
- Mix salt and water: Add several tablespoons of salt to a glass of water. Stir well until the salt dissolves to create your electrolyte solution.
- Optional Experiment: Test different salt concentrations to see how it affects your solar cell’s performance.
Step 3: Assemble the Solar Cell
- Place copper plates in the solution: Take your prepared copper sheet and a second, clean sheet of copper. Place both into your saltwater solution, ensuring they don’t touch each other.
- Secure them: Clip the plates to the edges of the container so they stay in place.
Step 4: Connect the Circuit
- Attach alligator clips: Use alligator clips to connect each copper sheet to a small electric device (like a mini LED) or a voltmeter.
- Ensure proper connections: One clip connects the prepared (oxidized) copper sheet, and the other connects the clean copper sheet.
Step 5: Test Your Solar Cell
- Place in direct sunlight: Take your setup outside on a sunny day. The sun’s rays will cause a chemical reaction in your setup that generates electricity.
- Measure the output: Use your voltmeter to measure the voltage generated by your homemade solar cell.
Congratulations—you’ve just built a working solar cell!
Also Check – Make Aqua Regia Solution at Home
Tips for Success
- Position matters: Test your solar cell in locations with abundant, direct sunlight to get the best results.
- Safety first: Handle the heated copper sheet carefully to avoid burns. Use tongs or heatproof gloves when working with hot materials.
- Experiment for better performance: Try using copper sheets of different sizes or testing varying salt concentrations to see how it impacts the voltage.
Creating a DIY solar cell is as much about experimentation as it is about functionality. Don’t be afraid to tinker with the process to discover what works best for you.
FAQs About DIY Solar Cells
Can you really generate electricity with household items?
Yes! While the electricity generated by homemade solar cells isn’t enough to power your home, it’s a fantastic way to understand how solar energy works.
How efficient are homemade solar cells?
Homemade solar cells have relatively low efficiency compared to commercial products. Nonetheless, they demonstrate the principles of solar energy effectively.
Can I scale up this project for larger energy needs?
Yes, but it would require more advanced materials and techniques. For significant power generation, purchasing commercial-grade solar panels is more practical.
Harness the Power of the Sun at Home
Building a solar cell from scratch using household items is an excellent DIY project for science enthusiasts and eco-conscious individuals alike. Not only does it teach you the principles of renewable energy, but it’s also a fun, hands-on way to reduce waste and introduce sustainable practices into your life.
Even small steps like this contribute to a brighter, more sustainable future. Who knows—this might inspire you to take on larger renewable energy projects in the future!
Have questions or want to share your DIY solar cell story? Drop your comments below and inspire others to join the solar revolution!

